Font Template: the simplest way to create your own font using Adobe Illustrator and FontForge
Adobe Illustrator font templates that allow you to edit shapes of glyphs (characters) altogether in one .ai file (or in their separate, respective .ai files if you want), then export them as .svg files, which can be imported into a font file in free and open-source font maker FontForge, and generate final production font files (.otf, .ttf, .woff, .woff2, etc.).
Files#
font_template.ai(download): Adobe Illustrator font template for basic and extended symbols and latin letters (significant CP1252 coverage), each glyph has a separate artboard, so that you can easily export each of them as individual glyph SVG file.font_template_single.ai(download): Adobe Illustrator font template for a single glyph. If you want, you can use this file instead of (or along with)font_template.ai.batch_import_svg.py(open, then Ctrl+S / Cmd+S to save): a python script that can import multiple SVG individual glyph files into FontForge's.sfdfont file (and can optionally convert it to production font files, i.e..otf,.ttf,.woff,.woff2, etc.)
(Instead of downloading the files, you may also git clone https://github.com/tomchen/font-template.git or download the whole repository)
(Make sure you use the latest version of FontForge, which is 20th Anniversary Edition (2020-11-07) (GitHub Release Page or FontForge.org Download Page). Old Windows version 20200314 crashes when importing SVG files.)
Usage#
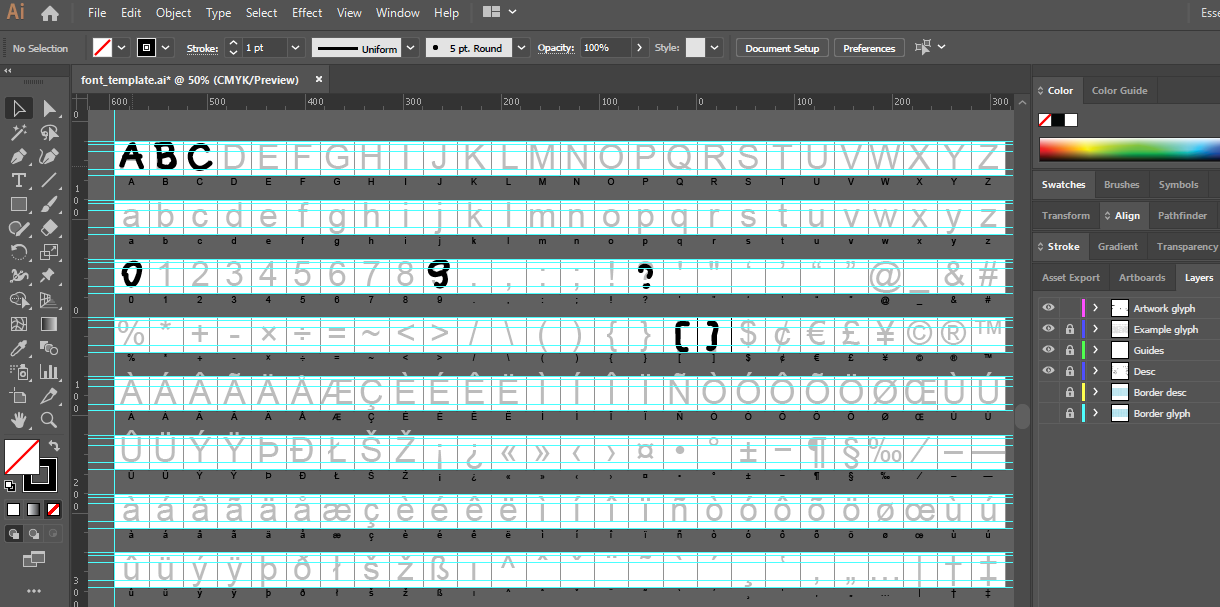
Open font_template.ai, draw your glyphs in the "Artwork glyph" layer.
(It doesn't matter if your glyph is partially and slightly outside its artboard.)
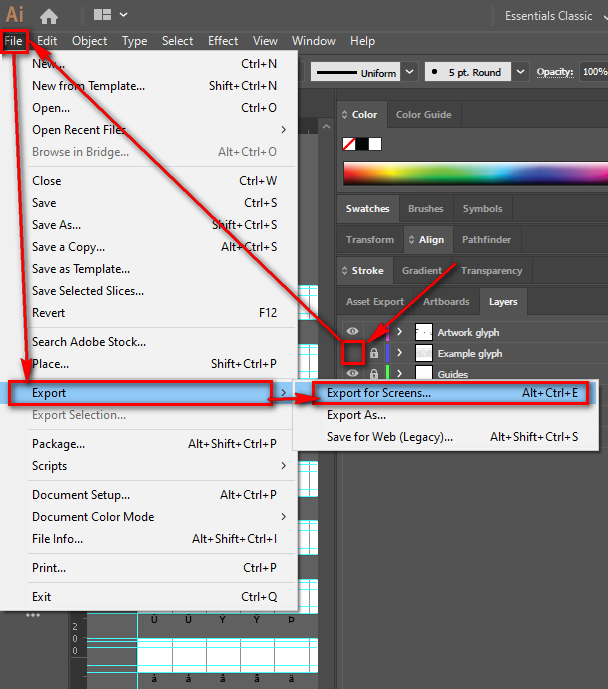
After finishing drawing the glyphs, hide "Example glyph" layer. Click "File" -> "Export" -> "Export for Screens".
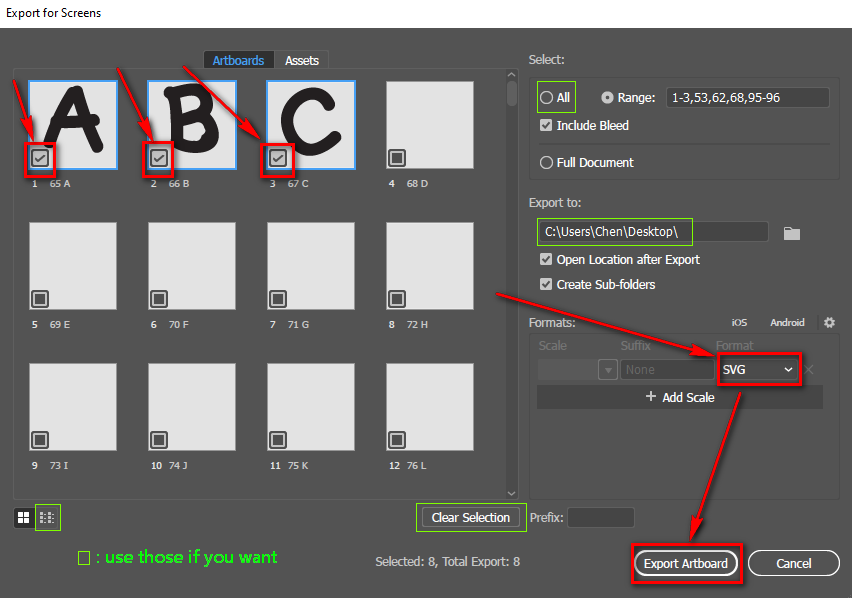
Select the glyphs you want to export (do not select empty ones), select "SVG" format, click "Export Artboard".
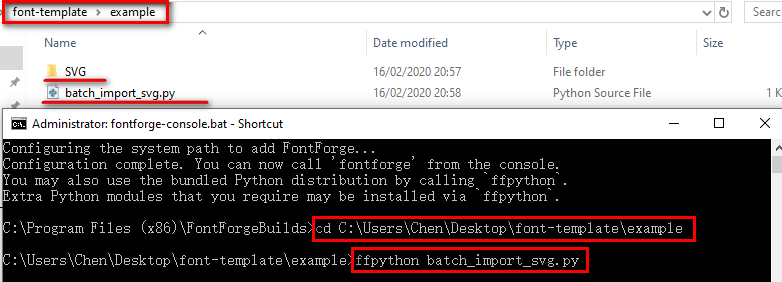
Exported individual glyph SVG files are inside an "SVG" folder, put it in a folder that also contains the batch_import_svg.py script file.
For Windows users, run C:\Program Files (x86)\FontForgeBuilds\fontforge-console.bat,* navigate to the folder using cd <FOLDER_PATH> and execute the Python script using ffpython batch_import_svg.py. An output.sfd font file will be generated.
For Mac or Linux users, cd <FOLDER_PATH> and execute fontforge -lang=py -script batch_import_svg.py.
(*: for 64 bit Windows it's Program Files (x86), for 32 bit Windows it's Program Files)
Open the output.sfd font file with FontForge. Adjust glyphs' width (use Shift key to select all the glyphs you want to adjust width, then, in the menu, select "Metrics" -> "Auto Width", OR, double click a glyph and manually drag its border line).

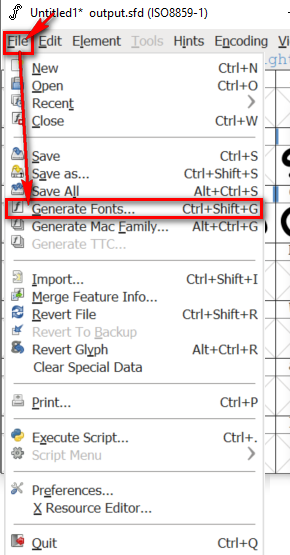
In the menu, select "File" -> "Generate Fonts..."
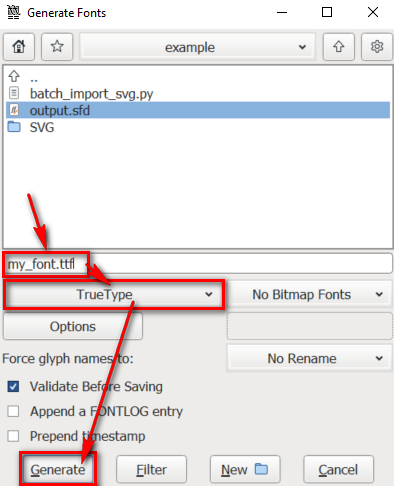
Type in a font name, select a font format (typically TrueType or OpenType), click "Generate" button. Then you have your self-made computer font!
You can stop here and do not need to read the following sections.
Other optional workflows and tips#
font_template_single.ai file#
This font template can be used to draw single glyph and produce single glyph SVG.
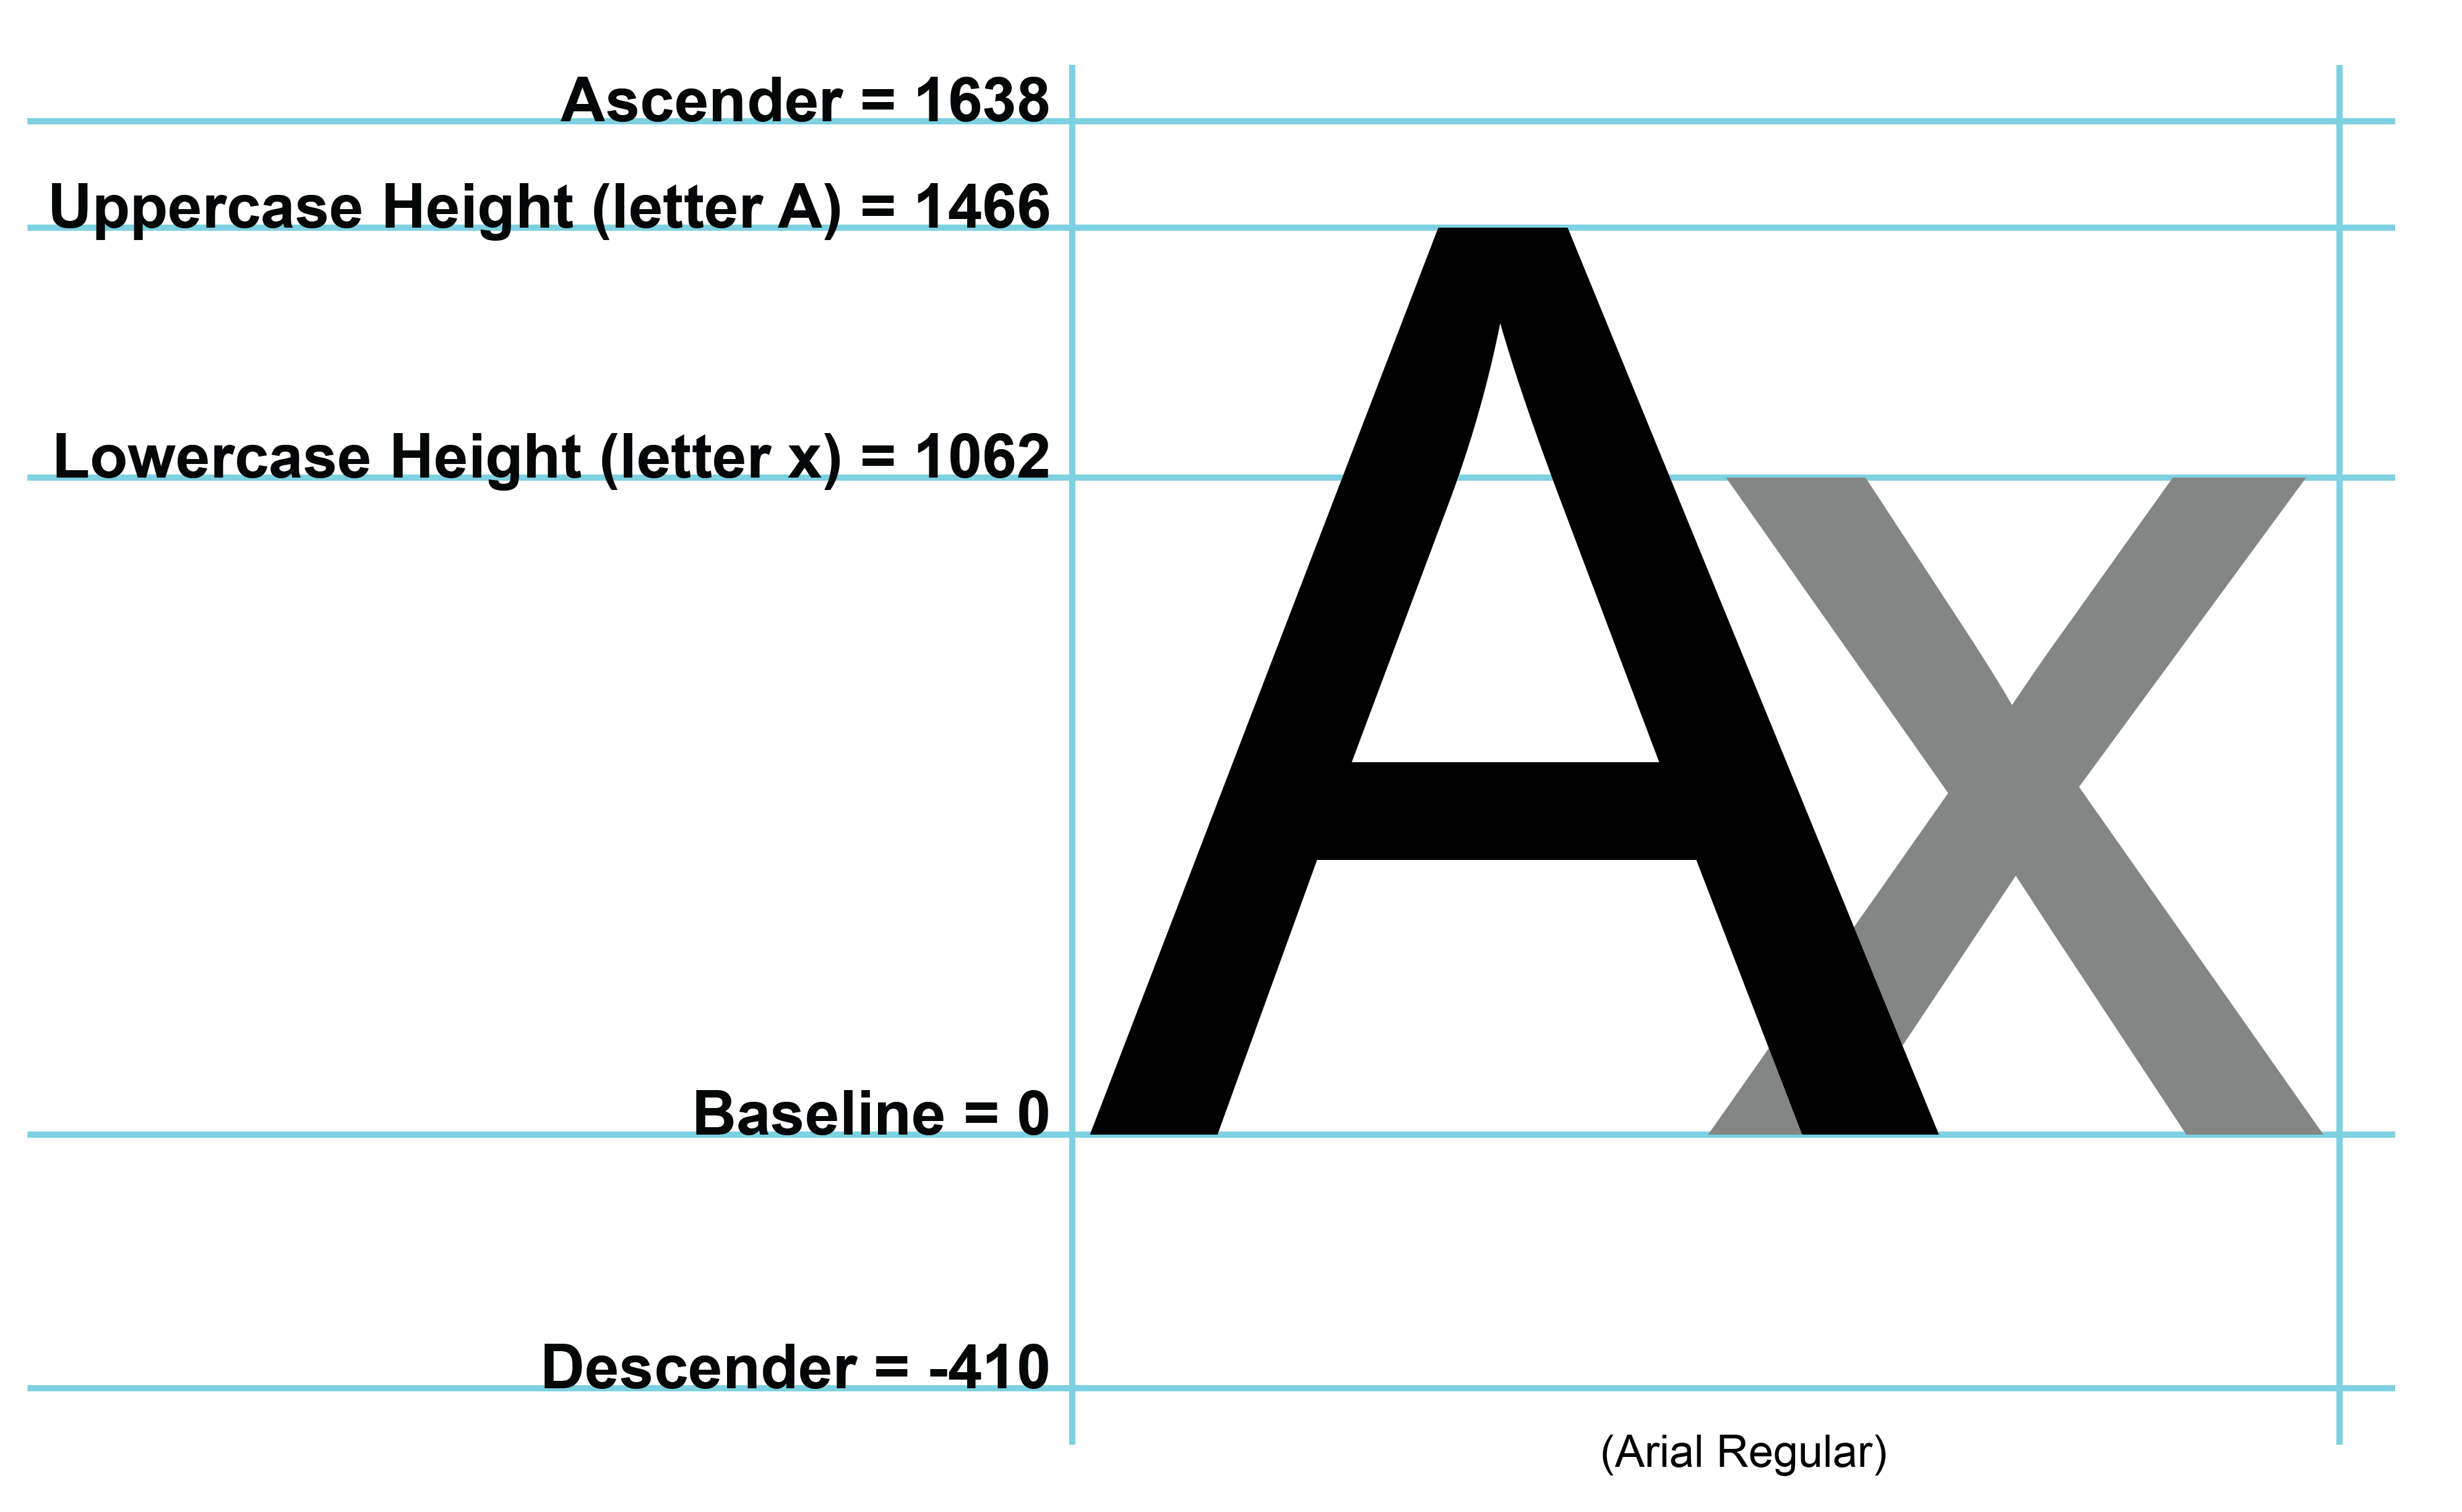
The following image depicts the guides of a single glyph.
In FontForge, select a glyph or open a glyph, then click "File" -> "Import...", select "SVG" as "Format", select your single glyph SVG file and import it.
batch_import_svg.py file#
Modify batch_import_svg.py file if you want to open an existing .sfd font file, or generate .otf, .ttf, .woff, .woff2 directly, instead of doing so with FontForge GUI.
Export all glyphs as individual SVG files in FontForge#
In the FontForge menu, click "File" -> "Execute Script"
Copy and paste: SelectWorthOutputting(); foreach Export("%e_%n.svg"); endloop;
Select "FF" radial button.
Click "OK" button.
Join overlapping paths#
If a glyph's shape contains multiple overlapping paths, it would be better to join them (a nice YouTube tutorial) instead of grouping them or making them a compound path. This step helps to avoid font rendering problems for overlapping paths. However, for seperate (non-overlapping) paths, feel free to use "group" (Ctrl+G) or "compound path" ("Object" -> "Compound Path" -> "Make").
Use existing free and open-source font file#
Instead of creating a font file with FontForge from scrach, it's sometimes a good idea to use an existing free and open-source font file as a base and fallback font. Typical open-source fonts with good glyph coverage are Adobe's Source Sans Pro and Source Serif Pro. Choose a weight such as "Regular", depending on your needs. Open the font file with FontForge, edit it to create your font. However, if you use an existing font, you may need to edit not only A-Z, a-z but also their ligatures such as "ff" and "fi".
Do not use empty glyphs#
When you select glyphs in Illustrator's "Export for Screens" window, you should not select empty glyphs, otherwise, you will see "I'm sorry this file is too complex for me to understand (or is erroneous)" warning when you execute batch_import_svg.py script. Nevertheless, it will not stop and will continue to generate the output.sfd file.
Update your font_template.ai before 2020-08-19#
On 19 August 2020, the project's font_template.ai file was updated (many artboard names were changed, e.g. 44 , were changed to 44 comma) to fix an Unicode filename issue. If you have downloaded font_template.ai before 2020-08-19 and made your .ai file based on the old version, you may optionally* update the artboard names in your font_template.ai using either* of the following methods:
- Copy your "Artwork glyph" layer (and any other layers you have added) from your old
.aifile to the latestfont_template.ai - Or execute
/other_files/update_artboard_names.jsin Illustrator: open your.aifile in Adobe Illustrator, in the menu, click "File" -> "Scripts" -> "Other Script...", find and select the downloadedupdate_artboard_names.jsfile, click "Open"
After the update, delete and regenerate your glyph SVG files in SVG folder.
(**: If you are using the old version but your glyphs are limited to basic ASCII characters therefore will not encounter any SVG Unicode filename related problem, you may opt not to update your .ai file)
Web fonts (alphabet or icon)#
Once you have your own font, you can use it on your web pages (including websites, web applications, Electron-compiled cross-plateform Desktop applications, or even React Native / NativeScript mobile app).
Your font can be alphabet font or monochrome icon font. If you want to show color icons, use SVG or PNG.
Put your .woff2 and .woff font files (my_font.woff2 and my_font.woff in the example) in your CSS folder and insert the following code in your CSS file (it supports IE9+):
(If you do not want to support any IE, you can delete the .woff file and use only .woff2 (the smallest and latest format))
Then use your customized font-family name ('MyFont' in the example):
HTML:
If it is a monochrome icon font, the letter B in the HTML code will be shown as the monochrome icon mapping to the letter B. Although web developers usually use characters in Unicode Private Use Area such as U+EEA0 and U+F2BB instead of basic latin letters and other commonly-used characters over semantics / SEO / accessibility concerns, nobody prevents you from using latin letters. To address those concerns, you may semantically identify a font icon by adding role and aria-label attributes to your HTML element:
Real-world example#
References and credits#
- How to Design a custom font using Illustrator and FontForge
This project is highly inspired by the fantastic article above which has its own single glyph template, although my template here has different guide proportion, and the native artboard export in lieu of a 3rd-party MultiExporter is used in the font creation flow described by this project. - Font creation template
This project is highly inspired by Fontself community's awesome template, as my template picks the same glyphs and has the same order. However, my template is a total remake, and does not require Fontself software. - Notes on dumping SVG outlines into a FontForge file
- FontForge: Export a font's individual glyphs into svg files in batch?
- How to import fontforge to python in windows 7
- AGL (Adobe Glyph List) glyphlist.txt
- Using @font-face
- Semantically identifying a font icon with role="img"
License#
MIT License for everything in this repository